Getting started with Calendrax
From installing the plugin to your first paid booking, plus a reference for shortcodes, emails, appearance and Pro.
Install the plugin
You need WordPress 6.4 or newer and PHP 7.4 or newer. HTTPS is required for live payments.
- In WordPress, open Plugins, Add New Plugin, and search for Calendrax AI.
- Press Install Now, then Activate.
- A new Calendrax item appears in the admin menu.
Nothing changes on your website until you place a shortcode. Calendrax never edits your theme, menus or existing pages.
Run the quick setup
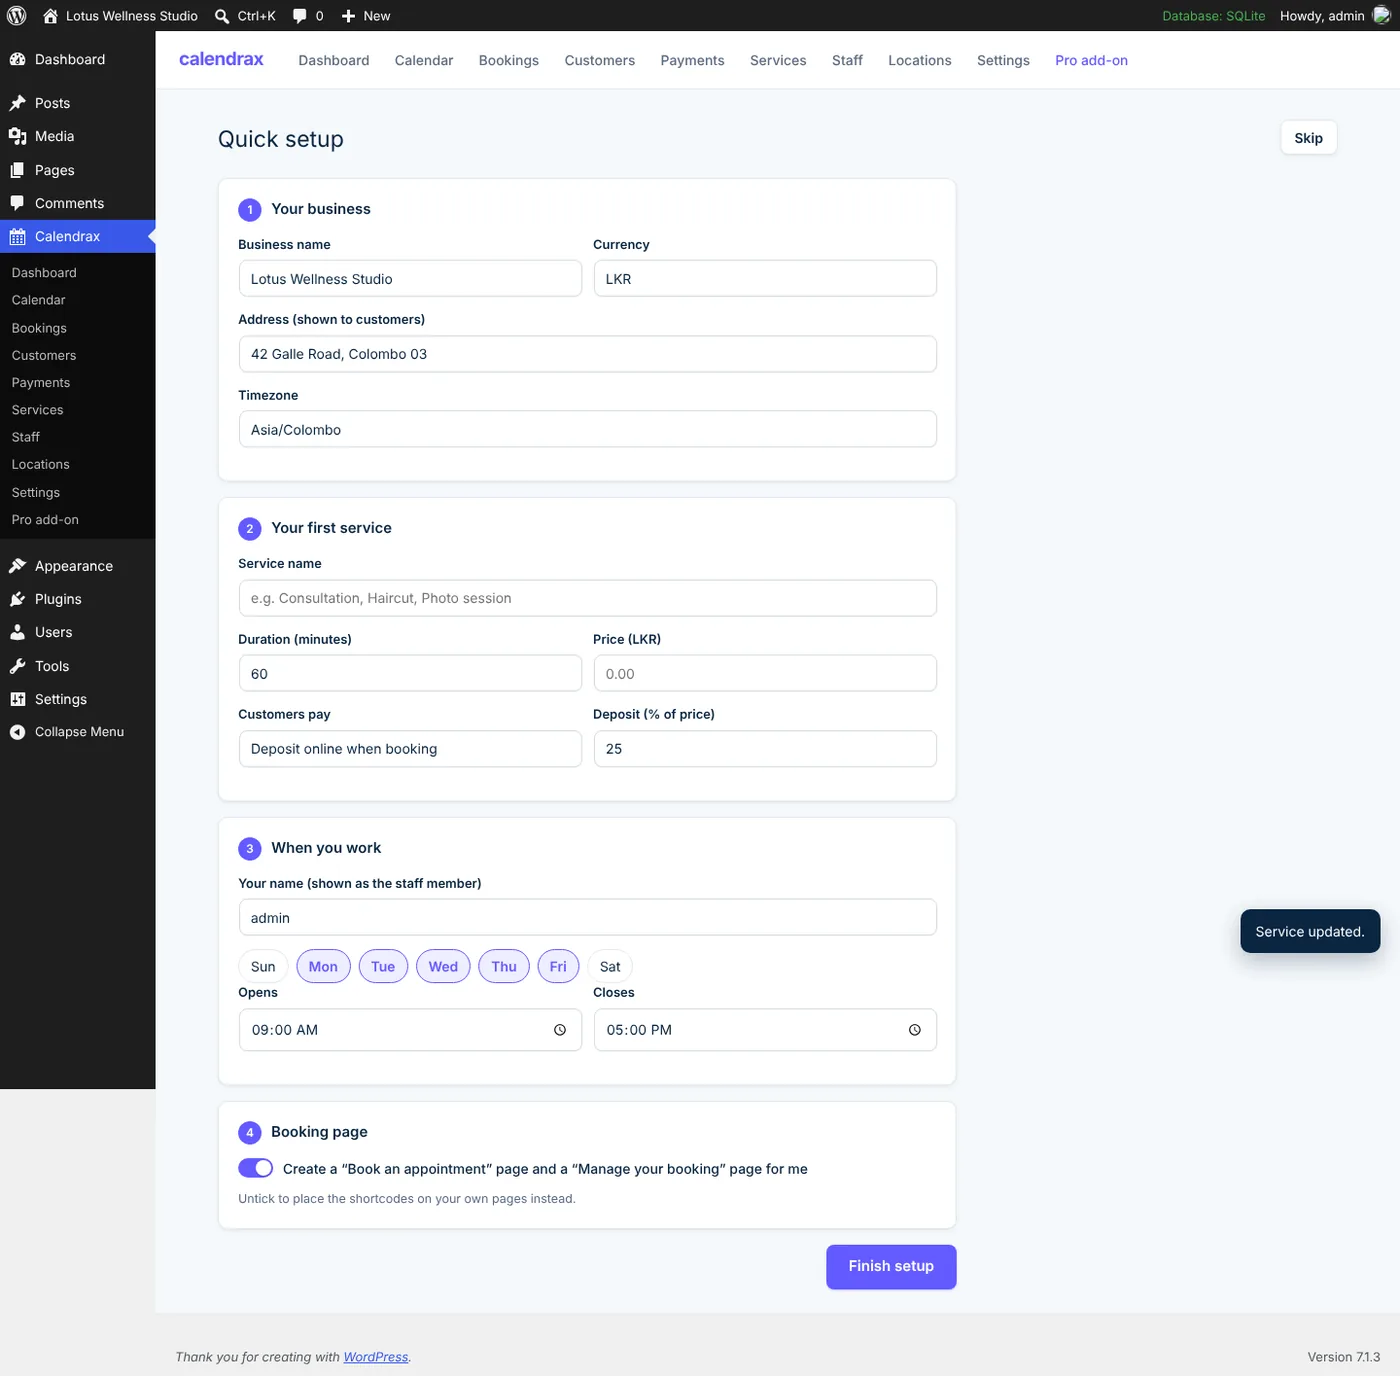
On a new site, the Calendrax dashboard offers a two-minute setup. It asks for:
- your business name, currency and opening hours;
- your first service, its length and price, and whether to take a deposit;
- whether to create the two pages customers need.
It then creates a Book an appointment page with the booking form and a Manage your booking page for customers’ links, and tells you if Stripe still needs connecting.
Connect Stripe
Open Settings, then Payments, and press Connect with Stripe. The setup guide inside the plugin walks you through it, and the Stripe guide on this site covers test mode, fees, security and troubleshooting.
Without Stripe you can still take free bookings and bookings paid at the appointment.
Shortcodes
Paste these into any page: the block editor’s Shortcode block, the Classic Editor, Elementor’s Shortcode widget or any builder that runs shortcodes. Settings, Shortcodes lists them with your real service IDs, ready to copy.
| Shortcode | What it shows |
|---|---|
[calendrax_booking] | The booking form. Add service="ID" to open one service directly, or staff="ID" to book one person. |
[calendrax_services] | A list of services with prices and Book buttons. Filter with category="Hair"; send buttons elsewhere with book_url="/book/". |
[calendrax_manage_booking] | Where customers view or cancel with the link from their email, and find your number to change the time (Pro: reschedule online too). |
[calendrax_ai_assistant] | Pro: the AI assistant inside a page. Most sites use the floating chat instead (no shortcode needed). |
Services and payment
Each service has its own length, price and rules. Open Services, then a service:
- Payment: free, pay at the appointment, deposit online (a percentage or a fixed amount, with an optional minimum), or full payment online.
- Timing: buffers before and after, minimum notice, and how many days ahead people can book.
- Capacity: more than 1 turns the service into a class or group session.
- Customer changes: whether customers can cancel, and how many hours before the start they can cancel or reschedule.
- Questions: extra fields such as “Any allergies?”
- Approval: confirm bookings automatically or approve each one yourself.
Staff and hours
Under Staff, give each person their weekly hours, breaks and the services they offer. Add days off or a few hours away as exceptions. When a customer chooses “Anyone available”, Calendrax picks the free person with the fewest bookings that day.
The manage-booking page
Every customer email includes a private link. It opens the page that has [calendrax_manage_booking] on it. You can either paste that shortcode on a page, or choose a page under Settings, General, Manage-booking page; Calendrax then shows the form on that page for you.
Emails
Settings, Emails holds every message: confirmation, reminder, cancellation, reschedule, deposit and balance reminders, and alerts to you and your staff. All use one modern design.
- The header uses your site’s primary colour. Pick another colour if you like; text colour adjusts so it stays readable.
- Add a footer line, such as your address or phone number.
- Use placeholders like
{service},{date},{time}and{customer_name}. - Press Preview to see the email, and Send test to receive one.
If emails do not arrive, your host may be blocking PHP mail. Install an SMTP plugin and connect it to your email provider; Calendrax uses whatever WordPress is set to send with.
Appearance
The booking form uses your theme’s font by default, so it looks like part of your site. Settings, Appearance lets you change:
- font (theme, system or a font name your site already loads), and text size;
- corner style: sharp, rounded or soft;
- colour mode: light, dark, or automatic to follow the visitor’s device;
- accent colour (your site’s primary colour unless you choose one).
Caching and speed
Calendrax tells caches not to store its live data, and when you change services, staff, locations or settings it asks the common cache plugins (LiteSpeed, WP Rocket, W3 Total Cache, WP Super Cache, SiteGround, Breeze, WP Fastest Cache, Cloudflare) to clear pages. If you use another CDN or server cache, exclude /wp-json/calendrax/ from caching.
Installing Pro
- After buying, download Calendrax Pro from the link on the success page or the download page.
- In WordPress, open Plugins, Add New Plugin, Upload Plugin, choose the ZIP file and activate it. Keep the free plugin active.
- Open Calendrax, Settings, License, paste your key and press Activate.
Reports appears in the Calendrax menu, and Settings gains AI assistant, Phone agent, Branch managers and Integrations tabs. See the voice agent guide for calls. Updates arrive on your Plugins screen.
AI assistant (Pro)
- Create an API key in Google AI Studio. Google bills you directly for usage.
- Open Settings, AI assistant, paste the key and press Test. If Google refuses, the message says why: a wrong key, a key restricted to certain websites, the API switched off, or a region where it is not offered.
- Turn on the floating chat, choose its colour, title, greeting and up to four quick questions, and pick the corner it sits in.
- Leave “Let the assistant read my published pages and posts” on so it can use them, for example to tell visitors about current offers.
The assistant only offers times and prices that Calendrax returns, and the visitor always presses Confirm. Add a line to your privacy policy saying chat messages are processed by Google; WordPress shows suggested text under Settings, Privacy, Policy Guide.
Phone agent (Pro)
- Create your account at Vapi. Vapi bills you per minute of calls.
- In Vapi open API Keys and copy the private key.
- In WordPress open Calendrax, Settings, Phone agent, paste the key, choose a voice and press Create my phone agent. Calendrax creates the agent, its booking tools and a private credential in your Vapi account.
- Paste Vapi’s public key under Talk in the browser and press Talk to it now: a free test from any country. A “Talk to us” button now appears on your website.
- For a phone number press Show my Vapi numbers, pick one and press Use this number. Free Vapi numbers are US numbers that answer calls only; for other countries import a Twilio number.
Callers can only change bookings that match the number they call from, or that they identify with the booking reference and their surname. The agent never takes card details: services that need a deposit get a payment link by email. Your site must be on HTTPS. Tip: keep your usual number and forward calls to the agent when you are busy or closed.
The free plugin shows customers “Need a different time? Call us” with the number under Settings, General. With Pro you can show the agent’s number instead and also let customers reschedule online.
Integrations (Pro)
Settings, Integrations has three tools:
- Promotion codes: lets customers enter codes you created in Stripe at checkout.
- Calendar feeds: private addresses to subscribe to in Google Calendar, Apple Calendar or Outlook, for all bookings or one staff member. Customer names are left out unless you turn them on.
- Webhooks: Calendrax posts JSON to your Zapier, Make or n8n address when bookings are created, confirmed, cancelled, rescheduled or completed, and when payments are received or refunded.
Each webhook is signed. Check it before trusting the data:
$body   = file_get_contents( 'php://input' );
parse_str( str_replace( ',', '&', $_SERVER['HTTP_CALENDRAX_SIGNATURE'] ?? '' ), $sig );
$expect = hash_hmac( 'sha256', ( $sig['t'] ?? '' ) . '.' . $body, 'whsec_cx_your_secret' );
if ( ! hash_equals( $expect, $sig['v1'] ?? '' ) || abs( time() - (int) ( $sig['t'] ?? 0 ) ) > 300 ) {
	http_response_code( 400 );
	exit;
}
Privacy and your data
- Bookings and customers stay in your WordPress database. Deactivating or updating never deletes them.
- WordPress’s Export and Erase Personal Data tools include Calendrax data.
- Optionally remove customers’ personal details automatically after a number of months (Settings, General).
- Data is removed when the plugin is deleted only if you turn on “Delete all Calendrax data when the plugin is deleted”.
When something is not right
Services I add do not show on the site
A page cache is serving an old copy. Calendrax clears the common cache plugins automatically; for other caches or a CDN, exclude /wp-json/calendrax/ and clear the cache once.
No times are offered
Check that the service has at least one staff member, that the staff member has working hours on that day, and that minimum notice and “book up to” days allow the date.
The manage link opens an empty page
Put [calendrax_manage_booking] on a page, or choose the page under Settings, General, Manage-booking page.
The AI test says Google rejected the key
Copy the key again from AI Studio with no spaces. If the key is limited to websites in Google Cloud, allow server requests (or create an unrestricted key for the server), and make sure the Generative Language API is enabled.
Settings, System status
This screen checks the database tables, time zone, WordPress cron, Stripe and failed emails. Include a copy when you contact support.