Connecting Stripe to Calendrax
Customers’ deposits land straight in your own Stripe account. Paste your Stripe keys or sign in with Stripe: it takes about two minutes, and Calendrax takes no fee.
Before you start
- A Stripe account, or ten minutes to create one.
- Your business details and a bank account for payouts (Stripe asks for these, not Calendrax).
- Your WordPress site on HTTPS. On a local test site everything works except the automatic webhook; payments are still confirmed by the return check described below.
Where to find it
In WordPress, open Calendrax, Settings, Payments. The setup guide on the right opens by itself the first time, and the Setup guide button brings it back.
- Connect your own Stripe accountPaste your API keys from Stripe, Developers, API keys (test keys to practise, live keys for real payments), or choose “Sign in with Stripe” and approve on Stripe’s own page.
- Sign in, or create a free Stripe accountNew accounts are asked for business details, a bank account for payouts and identity verification. You can start in test mode and finish these later.
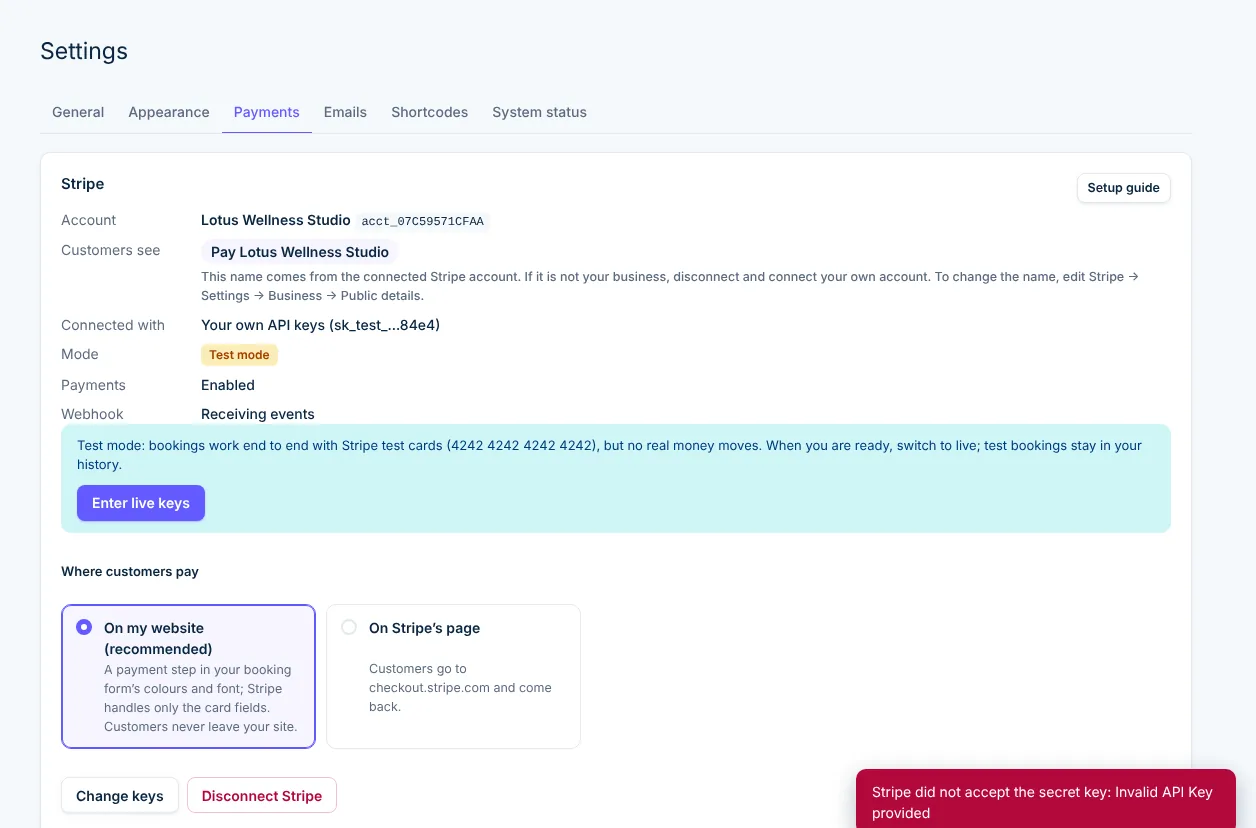
- Check the name customers will seeThe Payments screen shows your account and the business name on the payment form (“Pay …”). It comes from Stripe, Settings, Business, Public details.
- Ask for a deposit on a serviceServices, open a service, Payment: choose “Deposit online” (a percentage or a fixed amount) or “Full payment online”.
- Do a test bookingIn test mode pay with card 4242 4242 4242 4242, any future date and any CVC. The booking turns Confirmed and shows the deposit as paid. Then switch to your live keys or live account.
Two ways to connect
Both put payments straight into your own Stripe account. Pick one on the Payments screen.
Recommended
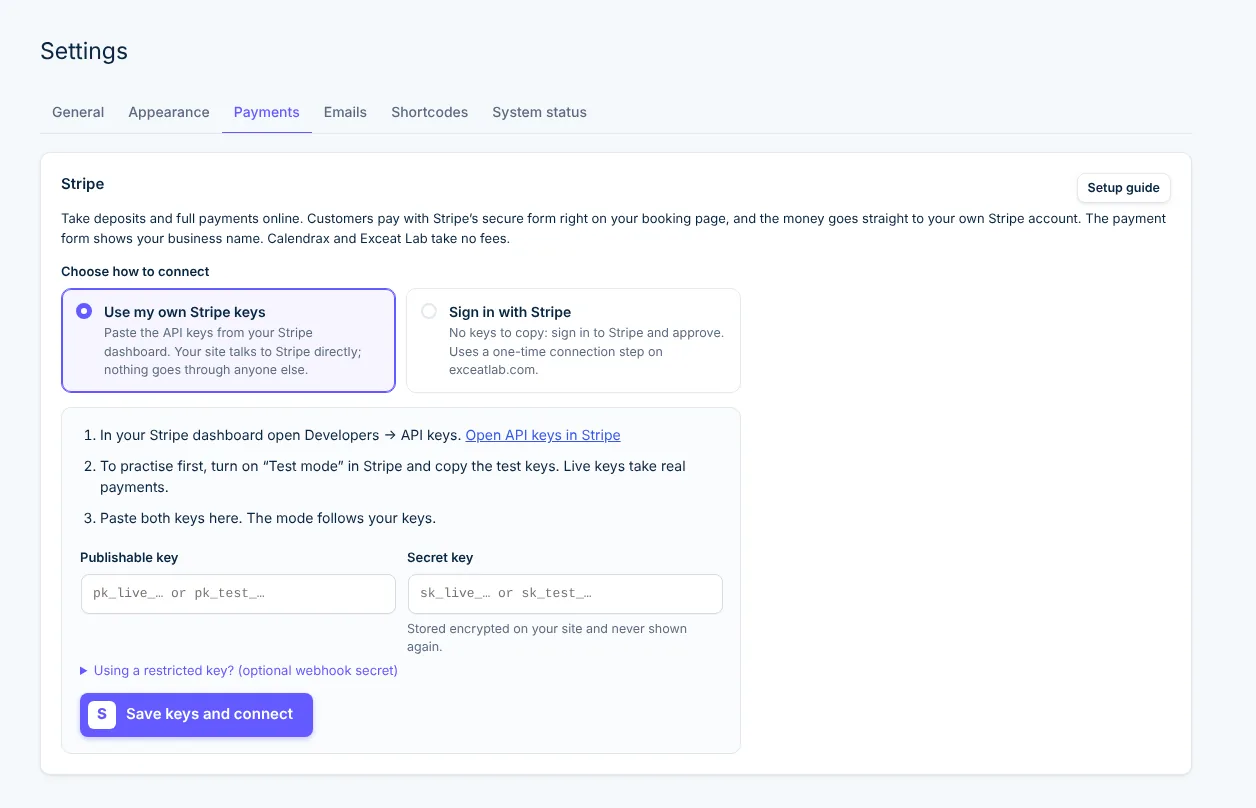
Use my own Stripe keys
Paste the publishable and secret keys from your Stripe dashboard. Your website talks to Stripe directly; nothing goes through anyone else.
- In Stripe open Developers, API keys. To practise first, switch on Test mode.
- Copy the Publishable key (pk_…) and the Secret key (sk_…).
- In WordPress open Calendrax, Settings, Payments, paste both and press Save keys and connect.
Calendrax adds its webhook to your Stripe account by itself. With a restricted key, add the endpoint in Stripe and paste its signing secret.
No keys to copy
Sign in with Stripe
Choose test or live, press Connect with Stripe, sign in and approve. A one-time connection step runs through exceatlab.com, which keeps only your Stripe account ID.
- Calendrax, Settings, Payments, Sign in with Stripe.
- Choose Test mode or Live payments.
- Approve on Stripe’s page; you come straight back to WordPress.
Customers pay on your booking page
After the details step, customers see a payment step in your booking form’s colours and font: the booking summary, the deposit due now, what is left to pay at the appointment, and how long the time is held. Only the card fields come from Stripe, so card details never touch your site.
Prefer Stripe’s own page? Under Payments, set Where customers pay to On Stripe’s page.

What Calendrax can do on your Stripe account
| Calendrax can | Calendrax cannot |
|---|---|
| Create a payment for each booking’s deposit or full price | See card numbers. Customers type those into Stripe’s secure fields. |
| Read whether that payment succeeded | Change your bank account, payouts or business details |
| Refund a booking when you press Refund in WordPress | Take any fee from your payments |
| Create one webhook endpoint pointing at your own site | Act on your account after you disconnect |
How your connection is protected
- Your secret key (or Stripe’s access token) is stored encrypted in your WordPress database and never sent to browsers.
- With “Sign in with Stripe”, Stripe’s standard OAuth flow is used with a one-time state value and a secret verifier only your site holds; Exceat Lab’s relay passes the credentials to your site once and deletes them within 10 minutes.
- Bookings are marked paid only from Stripe’s signed webhooks or a server-to-server check with Stripe, never because a browser came back from a payment page.
Fees
Stripe charges its normal card processing fee to your account. Calendrax adds no application fee, on Free or Pro.
Going live
- With your own keys: press Enter live keys and paste the live publishable and secret keys. With Stripe sign-in: press Connect live account.
- Check that Payments shows Live and “Enabled”. If Stripe still needs details from you, it says so there.
- Make one real booking with a small deposit and refund it from the booking screen.
Disconnecting
Press Disconnect on the Payments screen. Calendrax removes its webhook from your account and forgets the keys (with Stripe sign-in it also asks Stripe to revoke access). Past bookings and payment records stay in WordPress.
Test cards
| Payment succeeds | 4242 4242 4242 4242 |
|---|---|
| Asks for 3D Secure | 4000 0025 0000 3155 |
| Card is declined | 4000 0000 0000 9995 |
Use any future expiry date, any CVC and any postcode. These only work in Test mode.
If something does not work
Customers see another business name on the payment form
The name comes from the connected Stripe account. The Payments screen shows it under “Customers see”. If it is not your business, disconnect and connect your own account; to change the name, edit Stripe, Settings, Business, Public details.
“Stripe did not accept the secret key”
Copy the Secret key (sk_live_ or sk_test_) again from Stripe, Developers, API keys, and make sure both keys are from the same mode: two test keys or two live keys.
“The return address must be on the same site and use HTTPS”
Your WordPress address must start with https://. Turn on SSL with your host, then update the WordPress and Site Address under Settings, General.
Payments shows a webhook warning
Stripe could not register your site’s webhook address, usually because the site is local or behind a login. Payments still confirm through the return check and a check every five minutes, but a public HTTPS site is recommended for live payments.
A security plugin blocks the webhook
Allow POST requests to /wp-json/calendrax/v1/stripe/webhook. Every request there is verified with Stripe’s signature, so allowing it is safe.
The booking stays “Waiting for payment”
Check the booking’s history. If the customer closed Stripe before paying, the time is released when the hold ends. If they paid, the five-minute check confirms it even if a webhook was missed.
My currency is not offered
Calendrax uses the currency set under Settings, General. Stripe must support it for your country; most major currencies are supported.